The importance of measuring the distribution of vertical forces per wheel in static conditions for maintenance
The wheel load distribution of a railway vehicle is essential for the correct static and dynamic behavior of a rolling stock and for uniform wear of wheels and infrastructure.
Also from a regulatory point of view, the distribution of vertical wheel forces is subject to particular attention and limitations by the mandatory European Regulations currently in force (Directive 2016/797, Directive 2016/798, Commission Regulation 2014/1302).
Two previous articles (‘’Wheel load distribution’’ and ‘’Legislation’’) can better clarify the influence of/on the weight force distribution and how it is handled in the European regulatory framework.
This content, instead, focuses on the methods to be used to measure the weight force exerted by each wheel of a rolling stock correctly and in compliance with current standards.
The most recent and stringent standard on the measurement of vertical forces on wheels and wheelsets is called EN 15654 “Railway applications – Measurement of vertical forces on wheels and wheelsets”.
The standard is made of 3 parts. Each one focuses on a different aspect of the measurement of vertical forces on wheels and wheelsets:
- EN 15654-1 – “On-track measurement sites for vehicles in service” deals with the dynamic measurement of wheel forces and axle loads of in-service rail vehicles.
- EN 15654-2 – “Test in workshop for new, modified and maintained vehicles” deals with static wheel force measurements on wheels in workshops.
- EN 15654-3 – “Approval and verification of on-track measurement sites for vehicles in service” covers the approval and calibration of dynamic acquisition systems of Part 1, performed with the static weighing systems of Part 2.
Since the main point of our articles is the vertical wheel force distribution on wheels, we will briefly focus on the main aspects of Part 2.
The introductory paragraph of the EN 15654-2 states that the standard has been published in order to overcome the possible confusion due to several national and local procedures and methods for the measurement of wheel forces of new, modified and maintained vehicles in use across Europe. In fact, the current situation leads in some cases to non-comparable results from different sites or with different systems. The goal of the EN 15654-2 is to achieve comparable results for the same vehicles, even when the wheel forces are measured at different sites or with different systems. Most national standards, such as the French NF F 00-701, the German DIN 27201-5, but also some European standards relating to the wheel load subject, such as the EN 14363, have already specified to adopt EN 15654-2 once published.
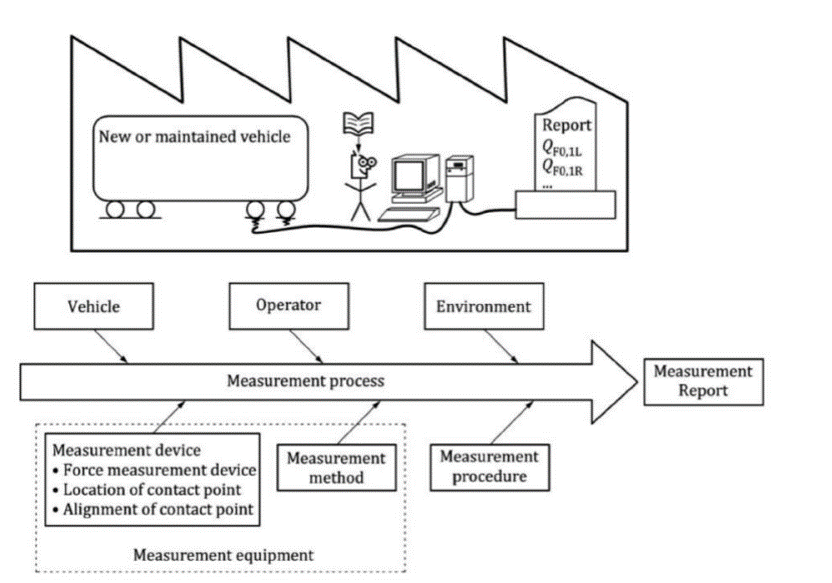
But how is EN 15654-2 able to fix the misinterpretation derived from the previous standards? It considers all the aspects to be taken into account in order to deliver comparable and reproducible results, even when the same rolling stock is tested in different sites. It not only regulates the characteristics of the measuring instrument, but also meticulously deals with the entire measurement process in order to perform an accurate, repeatable and traceable measurement, taking into account all the factors involved in the measurement process (Figure 1).

Chapters 1, 2 and 3 are introductory. The scope of the standard, the normative references, terms and definitions used within the text are dealt with.
Chapter 4 deals with all the factors involved in the measurement process. A summary is represented in Figure 1. It includes the possible equipment components to be used for the measurements, measurement methods, vehicle state, measurement environment, allowed contact points between device and rolling stock to measure the vertical wheel forces, quantities to be reported, etc.
The purpose of this content is emphasizing the particular attention that the standard places on the complete traceability of the measurement process. It is necessary to track all the aspects that may affect the measurement: from the state of the rolling stock suspension, to the indication of every component that acquires the load of each wheel. The tracking of the entire process of measurement is aimed mainly at:
- Minimising the human error
- Comparing coherently and completely measurements made on the same rolling stock over time.
Instead, chapter 5 of the EN 15654-2 standard is focused on the measuring system and the metrological confirmation. Device characteristics and acceptance criteria are provided. Furthermore, the standards, the calibration process to be followed and the verification, including the time interval between two calibrations, are specified.
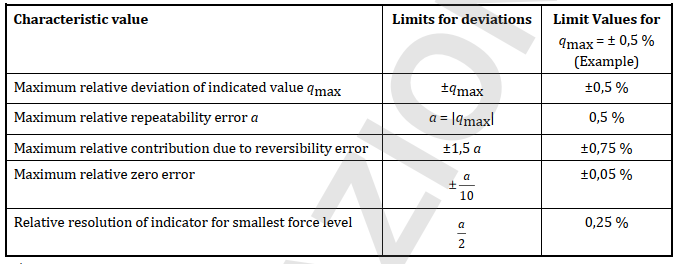
This content wants to underline one of the characteristics that the standard requires for a measuring system: the accuracy. The accuracy is one of the most important characteristics for this kind of device. Below, Table 3 of the standard shows all errors limits for accepting force measurement device:
 Table 3- Acceptance criteria for force measurement units
The limits for the different types of errors are very stringent. Specifically, they correspond to class 0.5 of the EN 7500-1 standard.
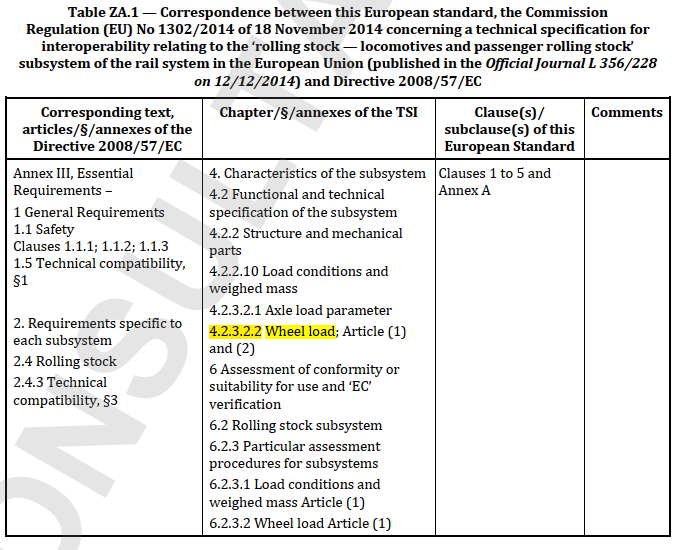
One of the reasons for such a stringent class request is presented in Annex ZA of EN 15654-2. The annex, in fact, makes explicit the direct link between the standard and the requirements imposed by the Technical Specifications of Interoperability in force within the European railway system.
It says that the EN 15654-2 standard has been prepared ‘’to provide one voluntary means of conforming to the essential requirements of the Directive 2008/57/EC on the interoperability of the rail system (recast) and with the associated TSIs’’. Furthermore, the annex shows the following summary table of the chapters of the TSIs for which the standard is proposed as a means of compliance verification:

The chapter highlighted in the table, corresponds to that of the TSI LOC & PAS which imposes a limit of 5% for the relative deviation between the vertical loads exerted by the two wheels of an axle (for further information on European standards, see the article “Legislation”).
Therefore, a measuring instrument with a high level of accuracy is required to evaluate a deviation of 5% of the wheel load on the same axle.
In conclusion, to complete the overview on the EN 15654-2 standard, a brief mention of the other annexes:
Annex A: Symbols and units of the standard.
Annex B and C: Influence parameters on the measurement and components of uncertainty from the measurement process.
Annex D: Gauging procedure to acquire the wheel vertical load.
Annex E: Additional quantities relating to the wheel load distribution to be reported.
Annex F: Examples of measurement report forms.
Annex G: Migration rule for this European Standard. It specifies that the transitional period should be 2 years from the date of publication (15-04-2019).
Are you ready for this change?


